
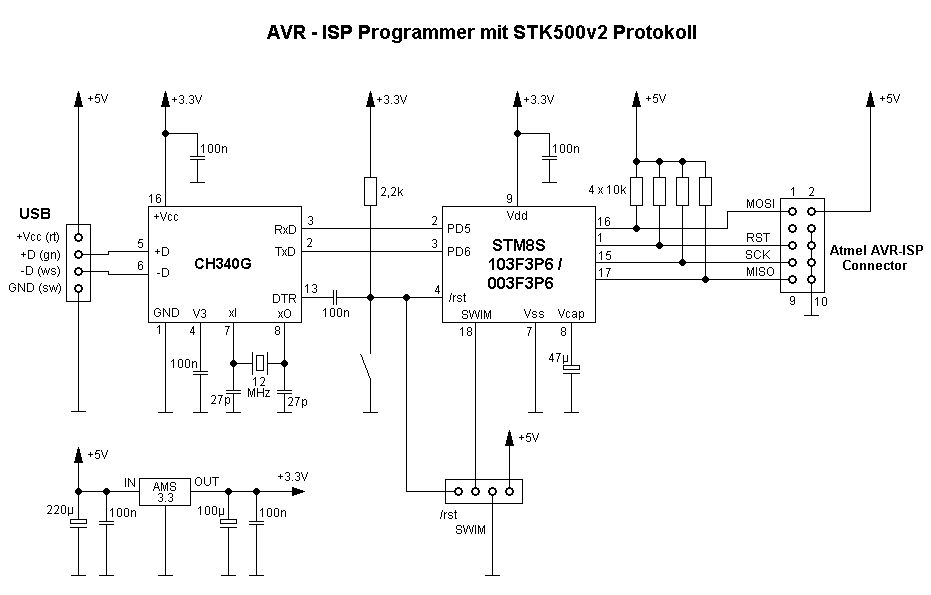
Im Verlaufe dessen, was man mit den ultra low cost Controllern STM8S103
und (noch billiger) STM8S003 anstellen kann (und was die können), habe
ich das AvrUsb500 Projekt von

http://tuxgraphics.org/electronics/200510/article05101.shtml

für die STM8 Controller geportet.

Somit steht denen, die sich mit STM8 (und STM32) beschäftigen und nur ab
und zu auch einen AVR flashen wollen / müssen ein Flasher für Atmel-AVR
Controller mit STK500 Protokoll zur Verfügung.

Hat man bereits eine Steckbrettvariante eines USB2RS232 Adapter wie
bspw.:

http://www.ebay.de/itm/USB-to-TTL-Converter-UART-module-CH340G-CH340-3-3V-5V-Replace-Pl2303-CP2102-/272365785787?hash=item3f6a4412bb:g:u7EAAOSwFdtXzaMJ

kann in Kombination mit dem "Minimal Experimentierboard"

http://www.ebay.de/itm/Minimum-System-Development-Board-Module-ARM-STM8S103F3P6-STM8-For-Arduino-/172277353430?hash=item281c87cbd6:g:9PYAAOSwI-BWMz3N

extrem preiswert ein AVR-Programmer realisiert werden. Wird der
Programmer wie im Schaltbild mit Bauteilen realisiert, beträgt der
Kostenaufwand (ohne Platine) kleiner einem Euro bei Verwendung eines
STM8S003 (Bezug aus China).

Die verwendete Toolchain ist SDCC 3.6 und das im Zip-File enthaltene
Makefile setzt einen installierten SDCC voraus.

Prinzipiell werden ausser einer USB2RS232 Bridge (mit TTL-Pegeln) und
einem Flasher der den STM8 beschreiben kann nichts weiter benötigt. Im
Bild und im Schaltplan ist allerdings mein Steckbrettaufbau gezeigt, der
einen einzelnen CH340G als USB2RS232 verwendet.

Der STM8 Controller kann auch mit meinem Bootloader aus

Beitrag "Re: Serial Bootloader für STM8S103F3P6 (Linux)"

beschrieben werden. Hier ist dann im Makefile die Zeile

FLASHERPROG = 0    nach   FLASHERPROG = 2

zu ändern.

Die Übertragungsbaudrate beträgt 57600 Baud.

----------------------------------------------------------------
Ausgabe des Programmers in Verbindung mit AVRDUDE
----------------------------------------------------------------
1 | jjflash@porteus:/home/mcu/stm8s103/stk500v2_03/release# avrdude -c stk500v2 -p t2313 -P /dev/ttyUSB0 -b57600 -U tiny2313_test.hex |
2 | |
3 | avrdude: AVR device initialized and ready to accept instructions |
4 | |
5 | Reading | ################################################## | 100% 0.11s |
6 | |
7 | avrdude: Device signature = 0x1e910a (probably t2313) |
8 | avrdude: NOTE: "flash" memory has been specified, an erase cycle will be performed |
9 | To disable this feature, specify the -D option. |
10 | avrdude: erasing chip |
11 | avrdude: reading input file "tiny2313_test.hex" |
12 | avrdude: input file tiny2313_test.hex auto detected as Intel Hex |
13 | avrdude: writing flash (2028 bytes): |
14 | |
15 | Writing | ################################################## | 100% 2.48s |
16 | |
17 | avrdude: 2028 bytes of flash written |
18 | avrdude: verifying flash memory against tiny2313_test.hex: |
19 | avrdude: load data flash data from input file tiny2313_test.hex: |
20 | avrdude: input file tiny2313_test.hex auto detected as Intel Hex |
21 | avrdude: input file tiny2313_test.hex contains 2028 bytes |
22 | avrdude: reading on-chip flash data: |
23 | |
24 | Reading | ################################################## | 100% 2.16s |
25 | |
26 | avrdude: verifying ... |
27 | avrdude: 2028 bytes of flash verified |
28 | |
29 | avrdude: safemode: Fuses OK (E:FF, H:DF, L:EF) |
30 | |
31 | avrdude done. Thank you. |