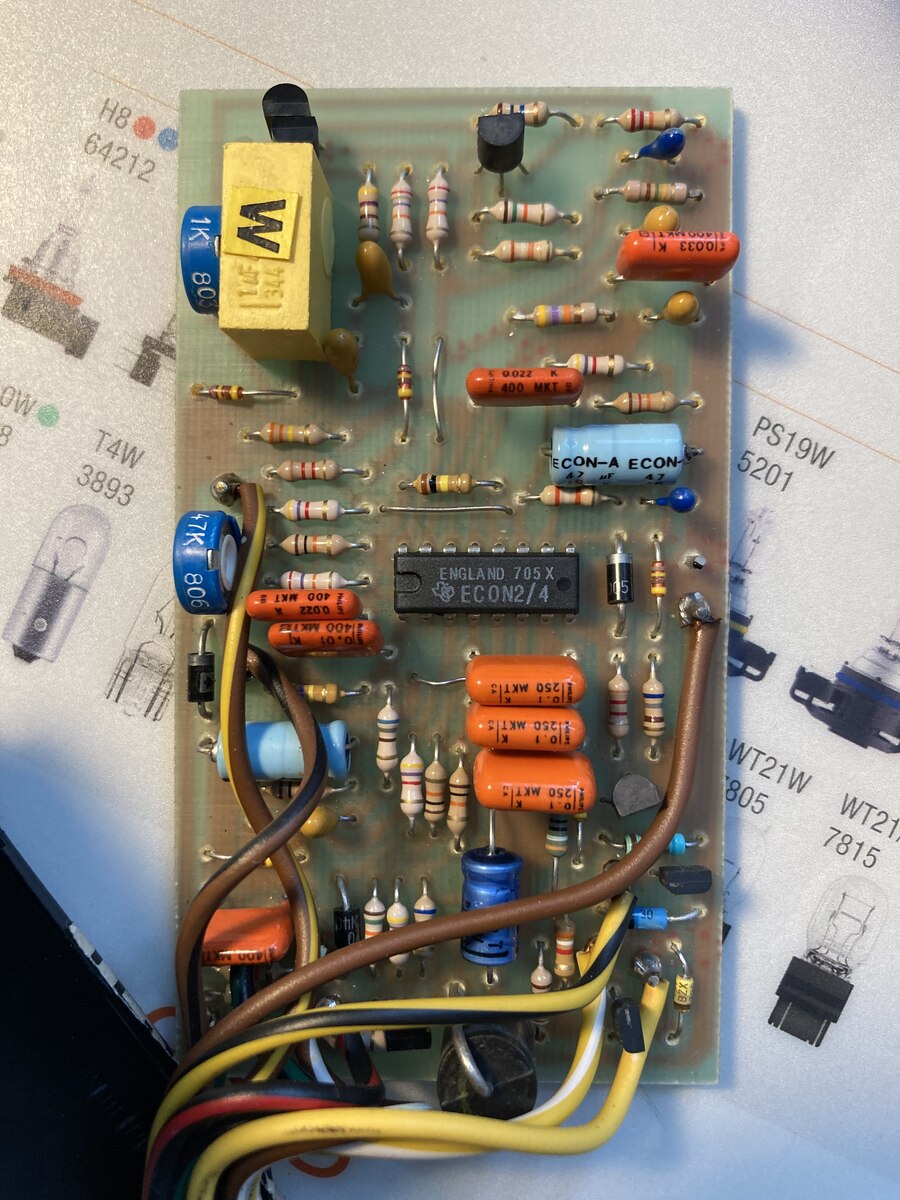
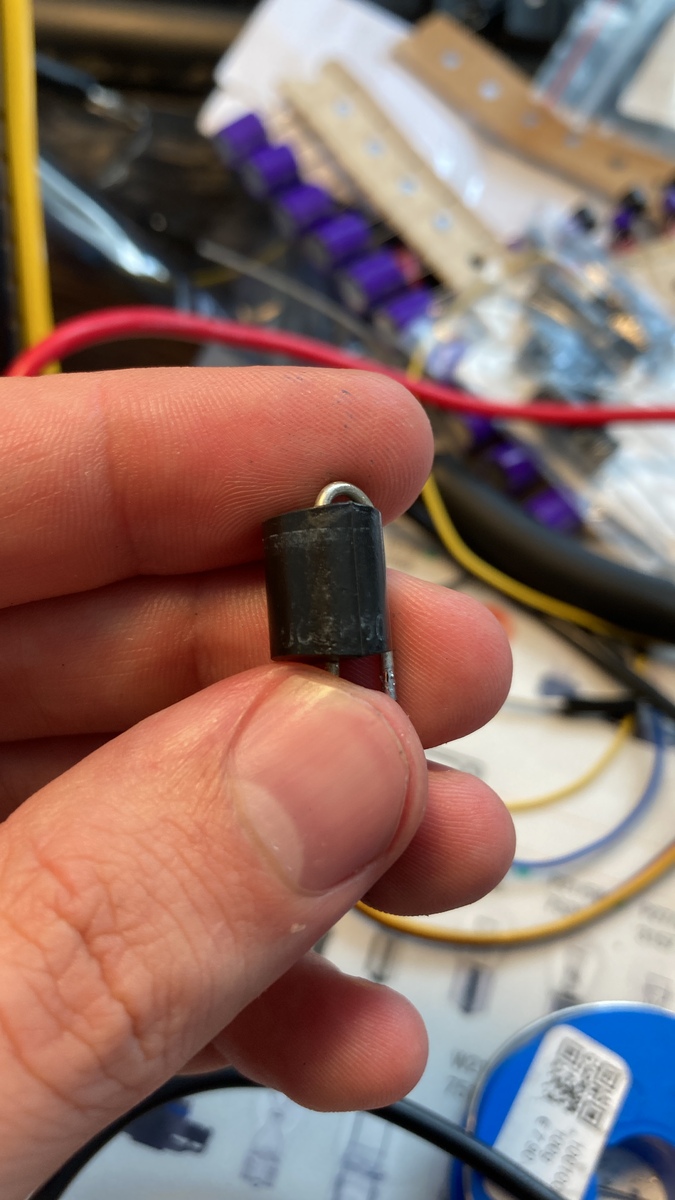
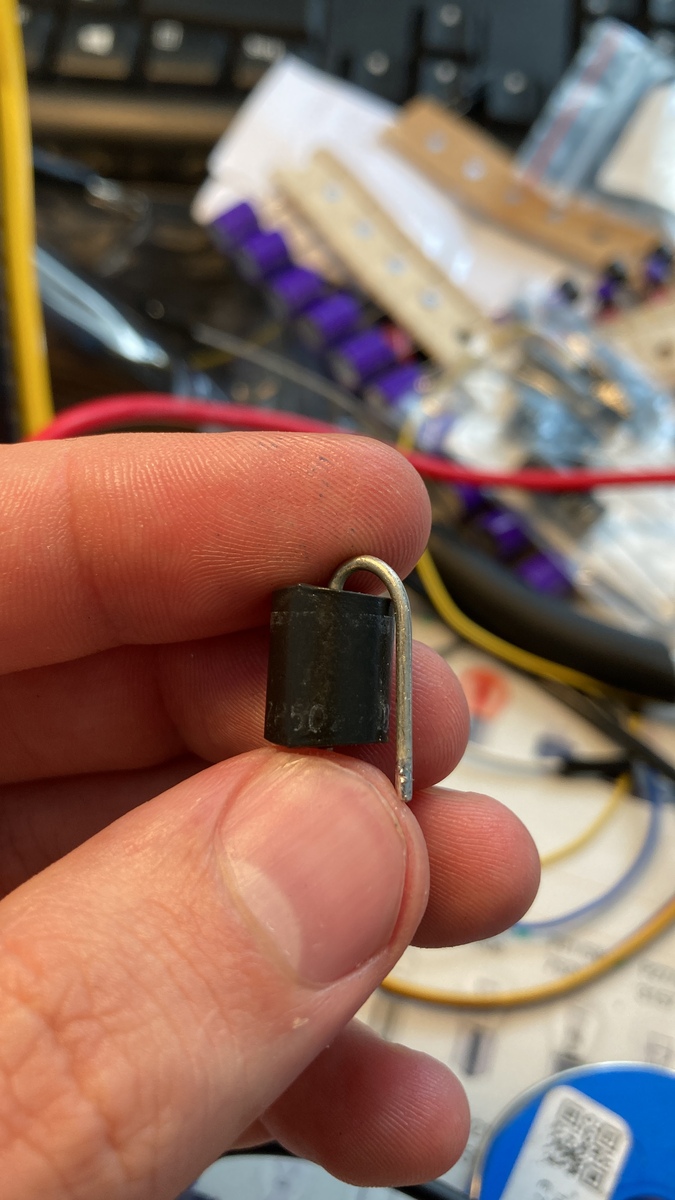
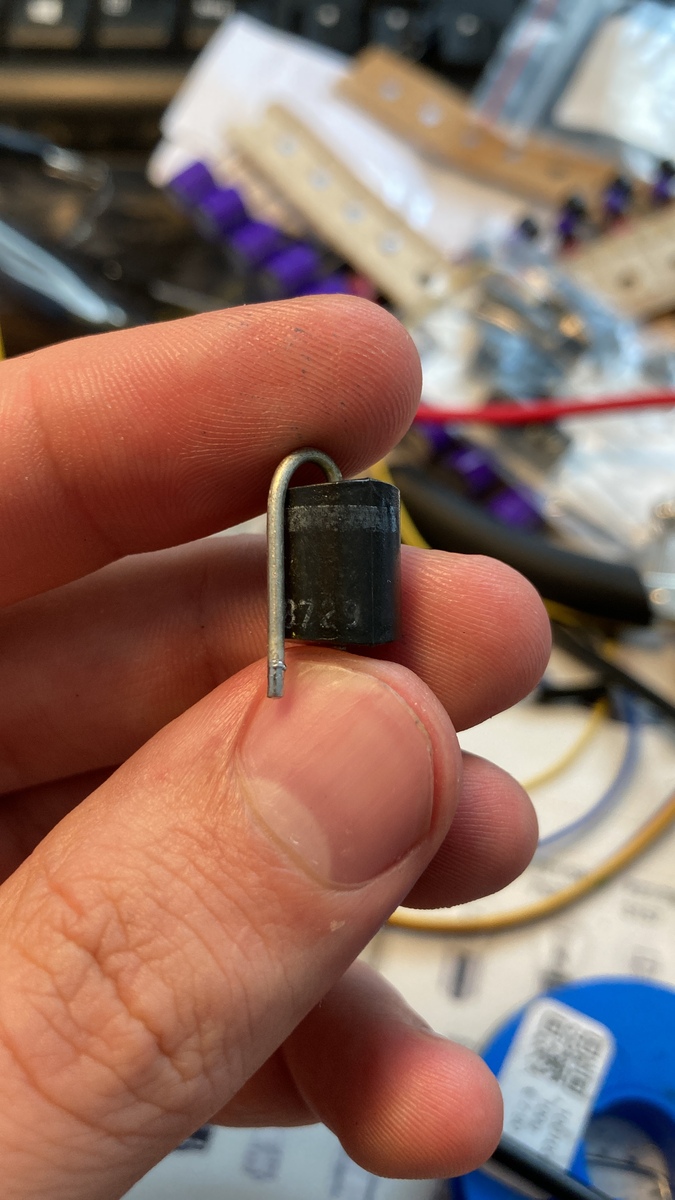
Moin Leute, ich hätte da mal eine Frage und würde mich über Hilfe
freuen. Im Anhang ist einmal die Platine einer Tempomat-Steuerung aus
einem alten Jaguar erkennbar. Auf der Platine befindet sich wie zu sehen
ist ein IC. Kennt jemand von euch zufällig dieses IC und oder hat eine
Idee wo man es beziehen kann. Im Netz ist leider absolut nichts zu
finden.
Auf den anderen drei Bildern ist vermutlich eine Diode?!? zu sehen?
Kennt wer die? Entziffern konnte ich auf dem Bauteil noch: LUC
ZP50278792
Für eure Hilfe wäre ich sehr dankbar!
Gruß, Sven
Angehängte Dateien:
:
Verschoben durch Moderator
Schau mal ob am IC auf Pin 7 ein 1kHz-Rechtecksignal gemessen werden
kann. Das Signal darf 0V bis 12V haben. Das regelt die Öffnungszeit des
Taktventils für die Unterdrucksteuerung der Drosselklappe.
Sven schrieb:
> LUC ZP50278792

Dein Jag ist wohl von 1987, und die Diode wurde trotz deines
Zahlendrehers in dem Jahr in der 29. KW gefertigt.

Das wird wohl eine Leistungs Z-Diode sein, heute würde man TVS sagen.
27V wären dabei ein plausibler Wert.


Der IC hat mindestens ein kundenspezifisches Marking, oder ist sogar
speziell für den einen Kunden entwickelt worden. Datenblatt und Nachkauf
wirst du vergessen können.
Es ist auch erlaubt, im Klartext den Namen des ICs und der Platine oder
anderes Zweckdienliches anzugeben.
TEXAS INSTRUMENTS  DIP16
ENGLAND 705X  705 X
[TI] ECON2/4

Interessanterweise ist der blaue Elko (47µF) auch mit ECON-A
beschriftet.

Hier habe ich einen kleinen Hinweis auf das IC gefunden:
https://forums.jag-lovers.com/t/xj-s-1984-v12-cruise-control-econocruise/296913
Cruise ECU  Econocruise

Gruß an Kollegen Hinz ;-)
> oder ist sogar speziell für den einen Kunden entwickelt worden.
Glaube ich eher nicht, so viele Jaguar sind damals nicht gebaut worden,
dass sich das gelohnt hätte.
Man müsste den Schaltplan zeichnen, dann sieht man schnell, was das IC
macht.
> Der IC hat mindestens ein kundenspezifisches Marking, oder ist sogar

Wuerde ich auch so sehen. Hat ja das MArking von TI, aber sonst wohl
kundenspezifisch. Auch wenn man kaum glauben mag das so eine kleine
Bude wie Jaguar sich das leisten konnte/wollte.

Olaf
Olaf schrieb:
> Auch wenn man kaum glauben mag das so eine kleine
> Bude wie Jaguar sich das leisten konnte/wollte.

Die Elektronik hat doch nicht Jaguar entwickelt und gebaut, das ist
typisches Zulieferzeug.
Olaf schrieb:

> kundenspezifisch. Auch wenn man kaum glauben mag das so eine kleine
> Bude wie Jaguar sich das leisten konnte/wollte.

Die Platine muss nicht unbedingt von Jaguar selbst stammen. Bereits in
den '80ern hatte man viel Elektronikentwicklung an Zulieferer
ausgelagert. Und für Lucas oder Delphi lohnt sich ein ASIC oder
Masken-ROM durchaus.
hier sehr interessante PDF- und Youtube-Links zum Testgerät
Jaguar Speed Control  Cruise Control Fault Finding using the Econocruise
Diagnostic Tester:
https://forums.jag-lovers.com/t/inside-econocruise-tester/396567
ich hänge sie sicherheitshalber hier an.

Aj109 Technical Services Bulletin 1:
https://www.youtube.com/watch?v=URtvv2Z0Wic
Eine Reparaturanleitung der Platine mit Bildern der Unterseite:
https://www.jaguarforums.com/forum/xjs-x27-32/cruise-control-rebuild-214084/
Gnd ist am IC-Pin 7 (von 16!)
Das Econocruise wurde nur in wenige teure Marken / Modelle verbaut.

Was funktioniert an der Platine / dem IC nicht?
Erstmal, vielen Dank euch allen für eure Bemühungen und Antworten. Das
wirft bei der Thematik endlich ein bisschen Licht ins Dunkle!

MaWin schrieb:
> Schau mal ob am IC auf Pin 7 ein 1kHz-Rechtecksignal gemessen
> werden
> kann. Das Signal darf 0V bis 12V haben. Das regelt die Öffnungszeit des
> Taktventils für die Unterdrucksteuerung der Drosselklappe.

@MaWin, hast du schon mal mit/an dem Steuergerät gearbeitet oder woher
das Wissen?


H. H. schrieb:
> Dein Jag ist wohl von 1987, und die Diode wurde trotz deines
> Zahlendrehers in dem Jahr in der 29. KW gefertigt.
>
> Das wird wohl eine Leistungs Z-Diode sein, heute würde man TVS sagen.
> 27V wären dabei ein plausibler Wert.
>
> Der IC hat mindestens ein kundenspezifisches Marking, oder ist sogar
> speziell für den einen Kunden entwickelt worden. Datenblatt und Nachkauf
> wirst du vergessen können.

@ H. H. das mit der Diode kling auf jeden Fall sinnvoll! Bzgl. Marking
vom IC hatte ich auch schon eine kundenspezifisches vermutet. Was die
Sache leider nicht einfacher macht. :/


Besserwisser schrieb:
> Eine Reparaturanleitung der Platine mit Bildern der Unterseite:
> https://www.jaguarforums.com/forum/xjs-x27-32/cruise-control-rebuild-214084/
> Gnd ist am IC-Pin 7 (von 16!)
> Das Econocruise wurde nur in wenige teure Marken / Modelle verbaut.
>
> Was funktioniert an der Platine / dem IC nicht?

@Besserwisser, da noch mal ein kleines "Extra-Dankeschön" für deine
Bemühungen! Wie ich sehe, gab es wohl schon vorher Leute, die sich damit
beschäftigt haben. Ich bin gerade noch dabei deine ganzen Links nach
eventuell helfenden Infos zu durchsuchen.
Bzgl. deiner Frage was nicht funktioniert: Stand jetzt weiß ich, dass
dieses "Steuergerät" defekt ist und nichts mehr macht. Ich habe es mit
dem Hinweis bekommen, dass diese Art "Steuergeräte" immer durch den
Umstand eines Kurzschlusses in der Elektronik des Wagens - außerhalb des
Steuergeräts - das Zeitliche segnen. Ich war jetzt eine Zeit lang auf
Fehlersuche und habe alle Bauteile einzeln überprüft. Es ergab sich,
dass die gezeigte Diode wohl defekt ist - wobei ich auch nicht ganz
ausschließen kann, dass das beim Auslöten passiert ist -. Da ich sonst
nichts auffälliges finden konnte, kam die Idee, dass das IC wohl mit
sehr hoher Wahrscheinlichkeit defekt sein könnte -> Quasi
Ausschlussprinzip. Ich bekomme zudem zeitnah - spätestens Morgen - noch
Schaltpläne des Wagens und habe die Hoffnung, dass ich dann vielleicht
bessere Möglichkeiten habe, zu erkennen, wo wann welche Spannung anliegt
und ich dementsprechend eventuell überprüfen und testen kann.
In Ebay findet man solche Steuergeräte, teilweise recht günstig:
https://www.ebay.de/itm/334378922076  für 29,31 + 15,27
Verkäufer territet (4494)
das ist allerdings ein DAC3672

https://www.ebay.de/itm/304527848796  für 41,11 + 76,65
Verkäufer stevessons (5439)
er bietet DAC4293, DAC3672, DAC3134, DAC1224 an
Angeblich sind alle funktionsgleich. Ob das stimmt?
Zitat https://www.ebay.de/itm/304527848796:
I have the following part numbers buyer must let me know the one you
want:
DAC4293
DAC3672
DAC3134
DAC1224
They are all interchangeable and serve the same function. Some guys need
exact number to match their restoration needs so tell me the number you
want.
Let me know the one you need.
Please email all questions before bidding.


Inside Econocruise Tester (INSTALLATION TEST)
https://forums.jag-lovers.com/t/inside-econocruise-tester/396567

AE ECONOCRUISE
PartNoDAC4293   PartNo DAC4293   Part No DAC 4293
SERIAL No 054494
AE PartNo 3.5392

Sehr ausführliche Diagnoseanleitung:
https://www.jag-lovers.org/books/old-xj-s/cuisecontrol.htm

Cruise Control Fault Finding.pdf (6 Seiten):
https://forums.jag-lovers.com/uploads/short-url/A9MXZvEQL2AjaKmYwTXryVRYMX4.pdf

Cruise diagnostics.pdf (2 Seiten):
https://forums.jag-lovers.com/uploads/short-url/voCoGWsLU5LsNbCb7WL7AKZNRfA.pdf

Ich habe mal den schlecht lesbaren Text von "Cruise diagnostics.pdf"
aufbereitet:
1 | Econocruise Speed Controller |
2 | INSTALLATION TEST |
3 | Econocruise Tester Instructions |
4 | Jaguar Cruise Control |
5 | |
6 | 1. Introduction |
7 | |
8 | Lamps, (1) to (9), check continuity of all wiring as follows and test switch functions. |
9 | RESUME, BRAKE-(from pedal action), NEUTRAL (from gear selector). They also indicate |
10 | the supply and continuity of the system fuse. |
11 | |
12 | Lamps, (10) and (11), indicate output from the Electronic Controller under operating |
13 | conditions with the system engaged. Two associate push buttons allow manual operation |
14 | of the Throttle Actuator, with lamp indication. |
15 | |
16 | 2. CONNECTION DETAILS |
17 | The Test Unit is connected between the Electronic Controller and the Cruise Control |
18 | System wiring loom installed in the car. |
19 | |
20 | 2a) Disconnect the Electronic Controller connector plugs. |
21 | 2b) Connect the Test Unit 9 pin plug to the system 9 pin connector. |
22 | 2c) Connect the speed input two pin connector to the system input connector. |
23 | |
24 | 3. STATIC CHECK |
25 | Set Test Unit switch to STATIC (13). |
26 | Continuity: |
27 | 3a) Set gearshift to NEUTRAL or PARK |
28 | 3b) Switch on ignition (ensure air conditioner etc. is turned off) |
29 | 3c) Speed Control Master ON/OFF Switch on ON |
30 | 3d) Check that the following lamps are alight indication correct continuity:- |
31 | 1 CONTROL valve solenoid and wiring |
32 | 2 DUMP valve solenoid and wiring |
33 | 5 BRAKE LIGHTS and wiring |
34 | 7 BRAKE SUPPLY wiring |
35 | 8 NEUTRAL OVERRIDE |
36 | 9 SUPPLY wiring |
37 | |
38 | Switch Functions: |
39 | 3e) The "NEUTRAL OVERRIDE" lamp (8) will light in all positions except Drive ('D' Position).
|
40 | 3f) Press control switch to the SET position. ENGAGE lamp (3) should light. |
41 | 3g) Press Master ON/OFF Switch to RESUME position. RESUME lamp (4) should light. |
42 | 3h) Press the brake pedal slowly. First BRAKE LIGHTS lamp (5) should go out and the |
43 | BRAKE lamp (6) should light. |
44 | With further depression of the brake pedal the CONTROL lamp (1) and |
45 | DUMP lamp (2) will go out. |
46 | |
47 | NOTE: If both lamps light together check for an open circuit in the wire to the |
48 | brake lamp side of the brake switch. If the brake lamps and wiring are |
49 | not continuous the system will not function. |
50 | |
51 | The static wiring and switch testing is now complete. |
52 | ******* |
53 | OVER..... |
54 | 4. ACTUATOR CHECK (Engine Running) |
55 | 4a) Test Unit switch (T4) to RUN. |
56 | 4b) Start engine, select NEUTRAL or PARK with handbrake on. |
57 | 4c) Depress DUMP button. DUMP lamp (11) should light, indication supply |
58 | feed to Actuator dump valve. |
59 | 4d) Hold the DUMP button and simultaneously press the CONTROL button. CONTROL |
60 | lamp (10) should light and the engine speed should increase as the Actuator |
61 | opens the throttle. If not, check Actuator vacuum hose and throttle cable |
62 | connections. |
63 | CAUTION: This operation causes engine rev's to build up rapidly, be sure to |
64 | release buttons quickly when operation is established. |
65 | |
66 | 4e) Release the DUMP button. |
67 | 4f) Switch off engine. The Actuator is functioning correctly. |
68 | |
69 | 5. DRIVING CHECK (Tester Connected) |
70 | Speed Input: |
71 | 5a) Start the vehicle and drive slowly. INPUT lamp (12) should flicker at slow |
72 | speeds indicating the presence of a speed input signal from the transducer |
73 | and driveshaft magnets. This will occur whilst the vehicle is moving. |
74 | |
75 | Electronic Controller: |
76 | 5b) Drive to about 50mph on a quiet, flat road. Press system SET switch until the |
77 | throttle pedal is felt to move. Release the switch and remove foot from throttle |
78 | pedal. DUMP lamp (11) should light. |
79 | 5c) The vehicle should cruise at ± 1 mph of the speed selected. If not, remove the |
80 | rubber grommet from the side of the Controller and adjust the set speed |
81 | potentiometer with a small screwdriver. Clockwise to increase. Counter-clockwise |
82 | to decrease the cruise speed. |
83 | Pressing the SET switch quickly several times should have very little effect on |
84 | the cruise speed, if the adjustment has been carried out correctly. |
85 | 5d) CONTROL lamp (10) should be flickering. Travelling uphill the lamp should |
86 | become brighter, and downhill should become dimmer. |
87 | 5e) Brake car to about 10 mph below the cruise speed. Both DUMP and CONTROL lamps |
88 | should go out as brake is applied. |
89 | 5f) Press system Master ON/OFF switch momentarily to RESUME position. DUMP and |
90 | CONTROL lamps should come fully one, and the car should accelerate back to |
91 | original cruise speed. |
92 | Just before this speed is reached the CONTROL lamp will again begin to flicker |
93 | as the system resumes control of the vehicle speed. |
94 | 5g) Press the brake pedal and allow the car to slow down to about 15 mph. Accelerate |
95 | slowly, using the throttle pedal whilst pressing Master ON/OFF switch momentarily |
96 | to RESUME position at about 1 mph intervals. As the Low Speed Lock Out point is |
97 | reached (about 22 mph) the DUMP and CONTROL lamps should come fully on, and the |
98 | car should accelerate back to the original cruise speed. |
99 | 5h) Move gear selector out of Drive. DUMP and CONTROL lamps should go out. |
100 | 5i) Re-engage Drive and press RESUME. DUMP and CONTROL lamps should come on, and |
101 | the car return to control speed. |
102 | |
103 | After completion of test, remove Tester from vehicle and re-connect |
104 | Electronic Controller to system connectors. |
105 | |
106 | HCT APRIL 1982 |
107 | |
108 | |
109 | (1) CONTROL yellow/black |
110 | (2) DUMP yellow/white |
111 | (3) ENGAGE black/pink |
112 | (4) RESUME black/white |
113 | (5) BRAKE LIGHTS green/violet green/purple |
114 | (6) BRAKE 2nd safety |
115 | (7) BRAKE SUPPLY yellow/orange? |
116 | (8) NEUTRAL OVERRIDE yellow/violet |
117 | (9) SUPPLY yellow/orange? |
118 | 10) CONTROL |
119 | 11) DUMP |
120 | 12) INPUT yellow |
121 | 13) STATIC |
122 | 14) RUN |
123 | |
124 | unknown colors: brown/yellow, brown/black, brown (Gnd), black/red |
125 | |
126 | Hersteller ist Econoncruise Ltd. 180 Wood Street, Rugby CV21 2NP England |
127 | Telephone: (0788) 74431 Telex: 31 1331 |
128 | An dieser Adresse sind jetzt Autowerkstätten, die Vorwahl ist nun 01788, die Ortskennung CV21 2YX. |
129 | WOOD STREET TYRES & AUTOCENTRE |
130 | RK Car Design |
131 | M&J+Motor-Vation |
132 | |
133 | Aktuelle Adresse 1994: |
134 | Butlers Leap; Rugby; Warwickshire; CV21 3RQ. |
135 | tel. (0788) 54 63 33 telefax (0788) 56 92 83 Employees: 90 Man. Dir. |
Ein ähnliches econocruise-Steuergerät aus einem
Rolls Royce Silver Shadow II:
https://www.ebay.de/itm/232377484390

Darin sieht man den ausgeschriebenen Firmennamen von AE:
ASSOCIATED ENGINEERING DEVELOPMENTS LTD
CAWSTON  RUGBY  WARWICKSHIRE   ENGLAND
https://i.ebayimg.com/images/g/0V0AAOSwXXxZRq4g/s-l1600.jpg
wie sind die mit econocruise verbandelt?
Bitte melde dich an um einen Beitrag zu schreiben. Anmeldung ist kostenlos und dauert nur eine Minute.
Bestehender Account
Schon ein Account bei Google/GoogleMail? Keine Anmeldung erforderlich!
Mit Google-Account einloggen
Mit Google-Account einloggen
Noch kein Account? Hier anmelden.